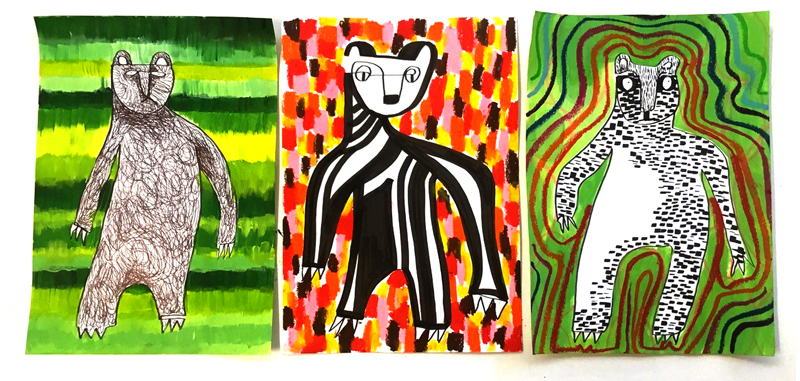
Three Bears Illustration
Year Levels: 3 – 6
with Kylie Wickham

Click Here to download Lesson Plan
Overview
In this activity, students will become illustrators. Their brief is to design three different bears for a story book. Students will use the design process and explore mark making, pattern and design. Students will use their knowledge of line, shape and colour to create different bear drawings and backgrounds within their artwork.
*When drawing, students often are happy with the first result; The process presented here encourages students to further explore rough copies and the illustration design process – resulting in multiple variations of a single idea.
Art Elements & Principles
Shape, Colour, Pattern, Line
Vocabulary
Words that describe lines and shape: Flowing, delicate, simple, bold, thick, dramatic, coarse, organic, curvaceous, geometric, angular, elongated
Cross-Curriculum / Capabilities Links
Language, Literacy
Learning Objectives
Students will:
Explore line through a variety of mediums and mark making skills.
Explore backgrounds using variety of materials and art elements.
Make three pictures of a bear showing three different designs and backgrounds. This will give students a comparison within their own journey through their artwork.
Create and compare backgrounds and foregrounds in their artwork.
Consider the art elements. Colour and against colour. Line variety. Shape variety in size. Pattern (when colour, shape and line is repeated what interesting patterns occur?).
Discuss by looking carefully at the work produced and reflecting on materials and processes.
Make
Create Artwork
PART ONE: Drawing Three Bears.

Step 1: For this activity, you will draw three different bears using a continuous line drawing technique.
*(A continuous line drawing is when you use one complete, unbroken line to create an entire drawing. It’s easy, just don’t take your pen off the paper!)
Draw your bears from your imagination, or you can use a reference image from a book or the internet to inspire you. (Why not try both!?)
Step 2: Once you’ve got an idea what your bears will look like, take a sheet of A4 paper and draw your first bear using a continuous line.
*Make sure the bears are large – almost as large as the paper, filling most of the space.
Step 3: Repeat two more times, using different materials for each drawing (i.e. Black marker, Pen and Fineliner)
Students should end up with three separate drawings of three different bears, on three sheets of paper.

Step 4: Take the first bear drawing and use a black marker to fill the inside of the bear shape with a design. Students may choose scribbles, dashes, long lines, thick lines, flicks, swirls, etc. When filled in, put this bear aside.
*Refer to the artwork outcome examples provided with this lesson plan or perform an internet image search for the term “Mark Making” for inspiration and starting points.
Step 5: Take the next bear drawing and repeat Step 4 – changing the design, pattern or mark making inside this bear. Put this bear aside.
Repeat again for the last bear drawing, again changing the fill design.
Now you should be three black and white bears all with a different shape and different marks and patterns on the inside.
PART TWO: Designing Three Backgrounds.

Step 6: Now we need to design some backgrounds for the bears.
*It is important students change materials with each picture. You will need three different backgrounds made with different mixed media.
Take this opportunity to experiment.
Work on some fresh sheets of paper to explore different mediums and mark making; using a new sheet for each new exploration OR creating a page full of explorations.
*Be sure to label or annotate your work so you know what you used to achieve each look/effect.
Step 7: Try mixing your mediums, such as acrylic paint & oil pastel, or watercolour paint & coloured pencil
*When using wet media (acrylic paint or watercolour) you will need to let this part dry before adding dry media (coloured pencil or dry pastel) on top.
Step 8: When exploring your backgrounds, consider pattern and design. Use a simple shape or line and repeat it. For example; stripes, lines, squiggles, swirls, spirals, or repeated shapes such as circles, squares, triangles etc.
Think about Colour and how you will use it. For example; Will you use Warm colours, Cool colours, or Contrasting colours?
Try mixing Primary colours to create Secondary colours.
Try blending colours to create tone or use bold separate colours.
Step 9: When you are satisfied with your explorations, choose 3 designs you like best and apply them as backgrounds to complete your three bear illustrations.

Extension
Taking it a Step Further…
- Can you design more characters?
- Can you write a story about your characters?
- Can you create a story book using the techniques you have explored here?
Discussion / Reflection
- Which background did you prefer and why?
- Which bear appealed to you the most and why?
- Did you mix more than one material or technique in a background?
- Did you try something new with your materials and pattern making skills?
- What is an illustrator?
Materials & Equipment
- A4 Paper
- Variety of black markers, pens & fineliners
- Acrylic Paint
- Watercolour paints
- Brushes
- Oil Pastels
- Pencils
- Crayons
- Coloured markers & highlighters
- Colour slicks *(optional)
- Smooth moves *(optional)
Don’t have these materials at home?
Click Here to view recommended materials
Inspiration
Related Artwork, Links & Sources
Share Your Outcomes!
How did you go!? We’d love you to share your artwork with us on Facebook or Instagram!
#zartart

