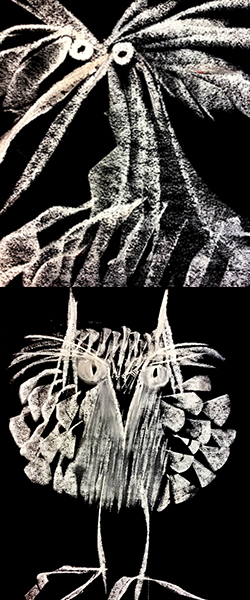
Oil Pastel Birds
Year Levels: F – 6
with Kylie Wickham

Click Here to download Lesson Plan
Watch Kylie present this activity in her short video
Overview
This activity will be an exploration of the oil pastel; how it moves and the marks that it can make.
Students will look at two different techniques and how they can use the oil pastel in different ways using the same motif.
Using the shape of a bird as a motif, students will explore the use of oil pastels, building confidence using mark making techniques while enhancing additional bird-like features & textures such as feathering.
Art Elements & Principles
Shape, Line, Pattern, Texture, Tone
Cross-Curriculum / Capabilities Links
Language, Science
Learning Objectives
Students will:
Explore the way we use oil pastels.
We will smudge, drag, pull, twist, flick and play for a range of mark making techniques.
Make images of birds from our creative memory or using references to help with shape and form.
Consider the shape of the bird and what it is doing. Is the bird bending to eat a worm, flying, bathing, sitting, singing? How can we visually describe these actions?
Discuss and research different bird types, artists who use birds as their motifs, stories and illustrations with birds.
Make
Create Artwork
PART ONE: (Black-on-White)
Oil Pastel Birds Exploring Different Starting Points

Exploration 1:
Starting Point: Bird Body
Step 1: Take a sheet of A3 white Cartridge Paper (or you can use your A3 sketchbook) and a black oil pastel.
Step 2: Start at the outside/corner of the paper and roughly scribble a small shape for bird, pressing firmly with your mark making.
Repeat so you have several birds in different positions all over your page.
Step 3: Now take your finger and smudge the oil pastel.
This will result in lighter and darker areas, creating tone for your bird.
*You may try using a paper stump if you have one, or if you prefer not to use your finger.
Step 4: Next, taking a greylead pencil, fineliner or black marker, add features such as legs, beak, feathers, eyes, etc.

Exploration 2:
Starting Point: Birds Eye
Step 5: Take a fresh piece of paper and this time start by using a fineliner or black marker to draw several different eyes scattered around the paper.
*You can do this yourself, or swap with a family member!
Step 6: Now take your black oil pastel and draw your bird shapes as you did before, but this time using the eyes as a starting point. Remember to press firmly using the oil pastel.
Step 7: Again, use your finger (or Paper Stump) to smudge the oil pastel bird shapes.
Step 8: Lastly add features such as legs, beak, feathers, eyes, etc.

PART TWO: (White-on-Black)
Oil Pastel Birds Exploring Different Mark Making
Exploration 1: Making Marks
Step 9: This time take a sheet of Black Paper and a white oil pastel.
Step 10: Start by placing the oil pastel flat on the paper, and then pulling/dragging it along its vertical axis. This will create a straight line. Explore different lengths of lines, and by applying varying pressure to the oil pastel.
Step 11: Now hold the pastel on its flat horizontal axis. Try different actions to create different mark making. Explore;
- Dragging the pastel in different directions
- Twisting the pastel
- Dragging and twisting at the same time
- Tapping the pastel
- Making dashes
- Making lines
- Making shapes
- Applying different pressure
Step 12: When your page is complete with different explorations, stand back and look at the marks you’ve created.
Do any look like the patterns and textures of a bird? Which techniques could you use to represent feathers? Wings? A beak?
Exploration 2: Creating a Bird
Step 13: Take a fresh sheet of Black Paper and your white oil pastel.
Step 14: We’ll start with the bird legs by dragging the white oil pastel along its flat vertical axis (for straight lines). Make smaller versions of this line for toes and claws.
Step 15: Now hold the pastel on its flat horizontal axis. Try different actions you’ve practised to create a bird.
Create a head, beak, body, wings, tail feathers using different mark making.
Step 16: Repeat this at least five times. Each time try to create a different bird by changing a feature. For example, try:
- Long legs, short legs, wide legs, bendy legs
- Long beak, open beak, arched beak, tiny beak.
- Short feathers, long feathers, fluffy feathers, scruffy feathers.
Extension
Taking it a Step Further…
- Look at all your birds from Part One (black-on-white) and pick one drawing you really like. Can you repeat this in a larger format?
- Can you use both techniques together?
(using a starting point and smudges with different mark making?)
- Can you use black and white pastels together?
- Explore using Coloured Paper as a background and combine using both techniques and using both black and white oil pastels.
Discussion / Reflection
- Did you try to use your pastel in ways you haven’t before?
- Did you prefer using your pastel in a certain way?
- Can you create a new way of using your oil pastels?
- Could you make your bird look like it was in different poses or situations?
Materials & Equipment
- A4 Black Paper
- A4 Coloured Paper/Pad
- A3 White Cartridge Paper
- White Oil Pastel
- Black Oil Pastel
- Fineline Pen or Black Marker
- Greylead Pencil
- Paper Stump *(optional)
Don’t have these materials at home?
Click Here to view recommended materials
Inspiration
Related Artwork, Links & Sources