iPad Photography Scavenger Hunt
Year Levels: F – 10
with Dee Zabel

Click Here to download Lesson Plan
Overview
In this activity, the focus is on taking interesting photos using an iPhone/iPad (Both devices will work for this unit, however the examples show screens from the iPad. (The iPhone is very similar but will take higher quality images and some models have optical zoom and Portrait Mode.)
People of all ages can enjoy the thrill of the hunt by participating in a scavenger hunt. A scavenger hunt typically requires the collection of random items of little value to be presented at the end of the hunt. In more recent times, photographs of the location/item have been used as evidence participants have completed their list. This hunt can be non-sequential and the first person/team to successfully finish their list typically wins a prize.
Help your student use the provided open ended scavenger hunt list to take better iPad photos using a few simple photography techniques. Your student will be taking better photos in no time at all!
Prepare
PART ONE:
You (parent/teacher/student) will help your student explore the features of an iPad’s camera. Follow easy to understand explanations of the basic features of the iPad’s camera. Adjust to suit your student’s level.
PART TWO:
You (parent/teacher/student) will help your student explore some photographic techniques for taking better photos. Images are provided to explain each technique/topic.
PART THREE:
Your student will take iPad photos, based on the list provided, of their local area (with supervision) using the explored techniques and tips.
Art Elements & Principles
Shape, Line, Colour, Texture, Pattern/Repetition, Emphasis, Movement, Balance and Unity
Learning Objectives
Students will:
Explore:
- The features of your device’s camera.
- How is digital zoom different to optical zoom? And which is better?
- How can using simple compositional techniques improve your photos?
- What is a macro photo?
Discuss:
- What makes a good photograph?
- How is taking a snap different from composing a photograph?
- Review the scavenger hunt list: What could you photograph for each item on the list? Why would you choose that location/object to photograph? How will you take an interesting photograph?
Consider:
- How can you use the Art Elements and Principles to make your photos more interesting?
- To get the best shot, how many photos is it necessary to take?
- What are the limitations of an iPad camera?
- What are the advantages of an iPad camera?
Make:
- Use the provided list to take a series of 5 -10 imaginative photographs that explore your home (inside/outside), school/school grounds or neighbourhood using several photographic techniques.
- The list will provide students with suggestions to encourage creative and open-ended outcomes e.g. repeated shapes, something you can climb up, a place to hide, or bright colours, instead of ‘a slide’ or ‘stairs’. Make sure the images are recognisable enough for others to find the location.
Extend:
- Use the images for a scavenger hunt.
Make
Create Artwork
PART ONE: Getting to Know Your Camera
Step 1: It’s important to spend a little time becoming familiar with the camera on your iPad.
Allow your student time to have a look around and play in the Camera app and see what they can already tell you how to use. (5-10 minutes)
Step 2: Now go through the following features they haven’t covered or expand on what they already knew with the information provided. This can be adapted for younger students. Features with an * can be explored with students that have more experience. Apple’s website is a great extension for older students to read up on more specific features they would like to explore, but these basics will get them going.
Zoom:  Slide your finger along the bar to zoom in and out OR expand and pinch your fingers on the screen will also zoom in or out. Most iPads will only have digital zoom, which means as you zoom in, your image will become more pixilated. iPhone 7s and higher have optical zoom which means that the lens physically moves closer to the image (Think a lens on a traditional camera expanding out) so your image will magnify more accurately. Zooming on an iPad isn’t recommended for taking quality photos. However, explore what happens with your student so they can make that discovery.
Live Photo: For this project, its recommended to turn off the Live Photo Feature. This captures 1.5 secs of what happens before and after you take the picture. It will capture a moment with movement and sound so that when you press on the image in your Photos App the image will come to life. Handy, but does slow down the capture and focusing of the image, and unnecessary for this activity. This feature is off when it is white with a line through the symbol. It is activated when it is yellow. (There are some fancy inbuilt editing tools for Live Photos that can be explored if of interest. visit the Apple Support website for more information)
HDR: Turning on High Dynamic Range will allow you to take photos in high contrast situations. (Some iPads will need you to turn this feature on/off in the settings.) The camera takes three photos with different exposures and compiles them together to make one image. This means that if you are taking a photo with something darker in the foreground and a bright blue sky in the background, the camera will adjust so that the image in the foreground isn’t super dark and the sky will not blow out to white, it will stay blue and the image will be balanced and in focus.

(above)
Image A: NO HDR – Plant is in focus and properly expose (not too dark) but background is blown out.
Image B: NO HDR – Plant is dark and out of focus, but the sky and background are crisp and colourful.
Image C: HDR ON – Both the plant and background are properly exposed and in focus.
Front/Rear Camera: This button will swap between the front and rear camera. It is best to use the rear camera for taking images other than selfies. This camera is a more powerful camera and will take better quality images (higher resolution).
Shutter Release: Push this button to take a photo. Be careful not to unintentionally hold down the shutter button. This will capture a Burst of photos. Great for capturing something in action but not needed in this task.
Volume Buttons/Head Phones: The iPad can be tricky for little hands to hold and keep steady. Sometimes it’s hard to do this and then push the shutter release, but you can also push the volume buttons to take a photo! Or if you have Apple headphones, the volume button on them will release the shutter as well.
Camera Roll: Pushing this button will take you to your Camera Roll of most recently taken photos. Great for a quick check of what you’ve just taken. But to view more photos go directly through the Photo App.
Mode: Newer iPads have several different camera and video modes. The different modes are in a list that you can slide your finger up and down to select different options. For this project, Photo and Square are the best options. Square images originate from traditional photography but have now become popular on social media (Instagram). (iPhone 7s and up have an additional Portrait Mode. This is an excellent feature and will help take interesting images. Very simply it keeps your foreground subject in focus and blurs the background. Great to explore if you have access to an iPhone.)
*For more information on Modes visit Apple Support.
* Yellow Focus Square: Tap once on the screen to choose what the camera will bring into focus. The camera will automatically adjust the brightness of the image.
* Brightness: When the Focus Square appears, there is also a sun symbol on a line. This is a sliding tool to increase or decrease brightness.
* AE/AF (Auto Exposure/ Auto Focus): This is for the more advanced student. If you push and hold on the part of the screen you want to focus on, the camera will lock on the specific focus distance and exposure. So, you can recompose your shot but preserve these settings, without the camera automatically selecting what it things you want in focus and how it should be exposed. To cancel this, tap anywhere else on the screen.
PART TWO: What Makes a Great Photo? (and a few easy photography techniques)
Step 3: Discuss with your students what they think makes a good photograph. More people than ever have access to digital devices that can take photos, but how do you become a good photographer? How is a happy snap/snap different than a composed photograph?
Visit the National Geographic website or view the National Geographic Instagram.
Under the menu tabs choose from Animals, History, Science, Travel to access galleries in these categories.
What do you notice about these images?
Make a list of why they are great photographs.
Your list might include:
- In focus
- Interesting angles
- Show emotion
- Tell a story
- Interesting lighting
- Document an adventure
- Make you react
Step 4: Choose a few or all photographic techniques to show and discus with your student. Using these techniques alone or in combination will help your student take more interesting photographs.
Focus: Make sure your image is in focus by holding the camera steady. Taking images in places that are not too dark. Photographing still objects will also help. Remember you can choose what your camera focuses on or let the camera select for you.
Cropping: Taking a shot that is closer up and more tightly cropped can be more interesting than showing the whole scene or object. It will also give the viewer clues to what it is without telling them everything. Cropping tighter will also make sure that things in the background don’t take away from the focus of the shot. You can always crop an image after but composing the shot properly from the start is always the best option. TIP: If you are planning on presenting your images as squares, you should take the original photos as a square.
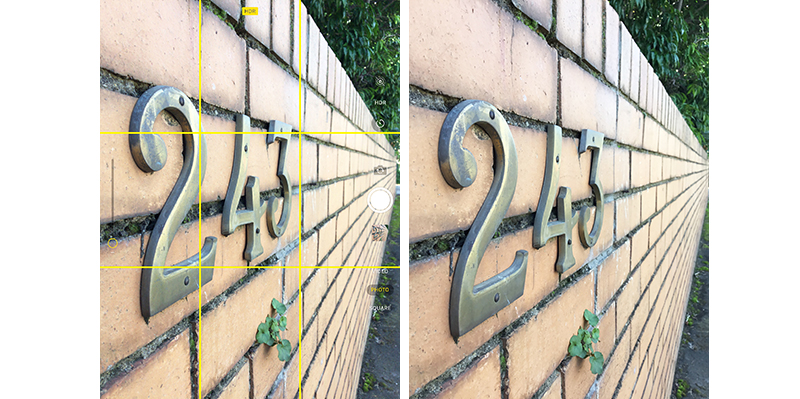
Rule of Thirds: The Rule of Thirds is a compositional technique that places the points of interest in the cross hairs of a grid that divides the image into thirds vertically and horizontally. You can turn on this grid by going into your iPad settings, finding the camera settings and turning on the grid. When you open the camera, the grid will be overlayed on your screen. This is a very easy way to start improving your photographs and create more balanced an engaging image. TIP: Make sure to consider what way your subject is pointing, as if they are pointing out of the frame vs into the frame the composition might not be as strong.

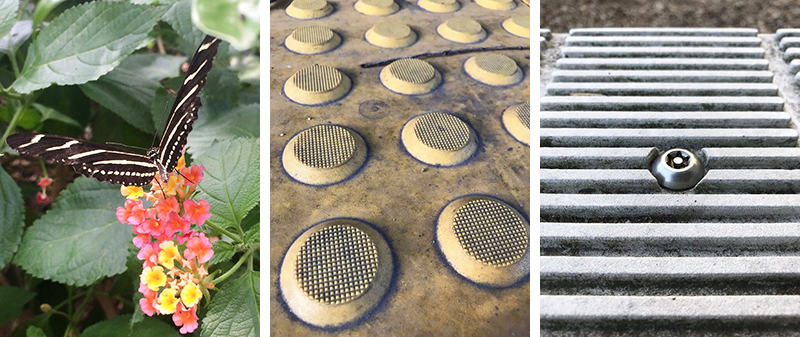
Macro Photography: A macro photograph is a close-up shot of a small subject; often a bug or flowers – but can be of anything really! For this project a macro photo of a texture or a feature of a location would be a great clue to where it is.

Leading lines: Use lines in the image (created by shapes, lines, textures, patterns) to move your viewers eye through the image.

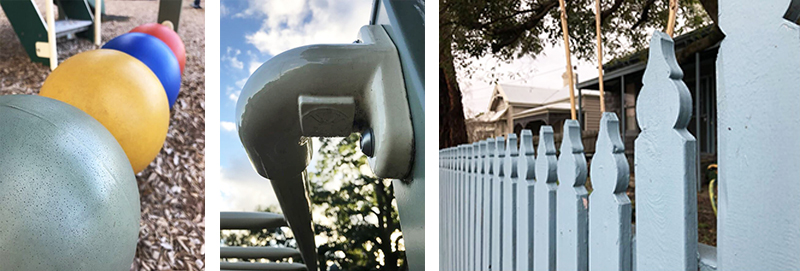
Change Your Perspective (Point of View): Instead of taking a shot front on, try a bird’s eye view (Top down), worms eye view (looking up or down low on the ground), side on view or on the level of the subject.

Frame within a Frame: Use another shape near your subject to frame the shot.

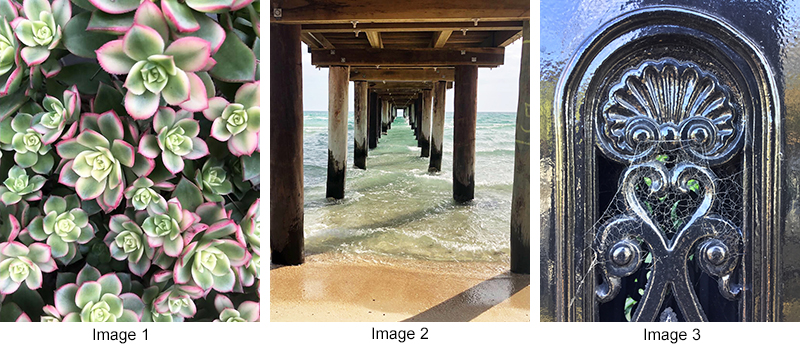
Art Elements & Principles: Using the Art Elements (Colour, Line, Shape, Texture, Form and Space) and Principles (Contrast, Emphasis, Movement Rhythm, Repetition & Pattern, Balance and Unity) can enhance your photos when more carefully considered and incorporated into your photographs.


(above)
Image 1: Contrasting colours create emphasis on the plants. Repeated shapes create texture and pattern.
Image 2: Symmetrically balanced image with repetitive lines and shapes that lead the eye to the horizon. Space is created in the image with the wooden bollards appearing smaller as they go off into the distance. The contrasting dark wooden pier stands out from the light blue background.
Image 3: Shapes and lines are symmetrically balanced.
Image 4: Contrasting colours create emphasis on the flowers.
Image 5: Complimentary colours (blue and orange) make the image eye catching. Contrasting vertical and horizontal lines move your eye around the image. The smaller orange brick area is asymmetrically
PART THREE: Take Some Great Photos!
Step 5: Use the list below, or make your own, as starting points for a photographic scavenger hunt. Challenge your student to take all photo suggestions on the list or adapt to suit your student’s needs. Encourage your student to take more than one image of their subject, to ensure it is: in focus, properly exposed, the best angle and the best image they can take. They may also choose to take more than one set of photos for each list item, so they have options to select the best photo.
*Remember:
Make sure the images are recognizable enough for others to find the location.
Make sure to set boundaries and supervise your student while they are taking photos, i.e. only in our house and yard, take a family walk and visit places that are known to them, or with in certain areas of the school grounds.
PHOTOGRAPHY SCAVENGER HUNT:
Can you take an interesting photo of the following things/places?
1. Something you can climb up
5. Something brightly coloured
6. A photo with leading lines
(Hint: To help others be able to locate this try to pick something that would be easily recognizable based on its shape or the ground surrounding the shadow. For example, maybe the flag poles shadow or the letterbox. The shapes of these will stand out more than just a generic tree or flower’s shadow.)
10. A place to play sport
16. An interesting point of view
17. Something with wheels
And Lastly…
Step 6:
Select your best photos to print, mount or frame for display!
Extension
Taking it a Step Further…
Extension Activity 1
Use the images for a scavenger hunt. Print each student’s images on an A4 sheet of paper. Swap papers with a partner. Hunt for the images’ location. When the location is found record the spot or subject of the photograph. At the end of the session discuss with your partner if they found the correct locations. A prize could be given to the person with the most correct locations.
Extension Activity 2
Explore the iPad’s in-built editing options to improve your images.
visit the Apple Support website for more information.
Discussion / Reflection
- What was easy or challenging about taking photos on an iPad?
- Why did you choose the photo you did for each item on the list?
- What photos do you think are your strongest? Why?
- What would you like to improve? Could this be done by editing the photo or would you need to retake it?
Materials & Equipment
- iPhone/iPad camera
- Printer *(optional)
Inspiration
Related Artwork, Links & Sources
Click Here to download this Lesson Plan
All photographs in this unit are courtesy of Dee Zabel.
Share Your Outcomes!
How did you go!? We’d love you to share your artwork with us on Facebook or Instagram!
#zartart

