Collage Cockatoo
Year Levels: 3 – 6
with Kylie Wickham

Click Here to download Lesson Plan
Overview
In this lesson, students will get to explore the visual conventions of contrast, pattern and texture -through experimenting and creating with different papers. Students will use the design process to make creative decisions and direct their own individual responses to the task.
Note: This is an accessible collage lesson that has produces great results.
It promotes cutting skill and can be very therapeutic if approached correctly.
This activity uses a ‘jigsaw and laying’ process, and photography as a resource.
Student responses can progress through several layers and changes before the end result is settled upon.
Art Elements & Principles
Pattern, Shape, Texture
Learning Objectives
Students will:
- Explore a variety of papers and use their own creative decision making.
- Make different shapes with their cutting skills. Using positive and negative shapes to fill the bird.
- Use individual judgements to continuously reassess their work.
- Be able to discuss their artworks and decision-making process.
Make
Create Artwork
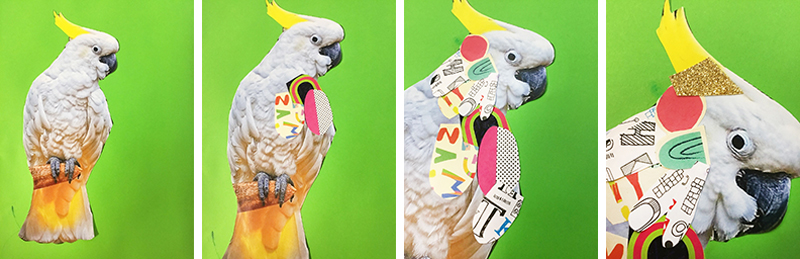
Step 1: You will need an A4 photograph of a cockatoo. Make sure it is a profile (side on) picture, so the shape of the beak is easily seen.
Step 2: Carefully cut the bird out.
Step 3: Place the bird on a coloured piece of paper of your choice and move it around until you find a pleasing composition.
Step 4: Glue bird down onto coloured paper.
Step 5: Start with larger shapes and start to glue them down inside bird. Be careful to stay inside the lines of the bird.
Step 6: Continue laying down papers. You may find that you are starting to cut different shapes.
Step 7: Continue to fill bird with shapes but do not cover up eye. Leave the eye and area around it until last.
Step 8: Start cutting smaller shapes and layering your papers. Be aware of shapes that you are cutting and how they look on your work. You may like to start cutting feathery shapes.
Step 9: Continue to cut and layer filling shape.
Step 10: Look around at your scraps (negative shapes) see if you can incorporate some of these into you collage.
Step 11: As you come to an end you will have the eye and area around left, you can leave this area exposed or you can continue to collage and go over eye.
Step 12: Complete! I like to leave the collage a flat colour in the background for contrast.
As an extension, you may want to now collage your background.
What other animals can you collage?
Discussion / Reflection
- How does it feel when you are cutting shapes?
- Did you find an easy way of gluing?
- Did you find yourself fitting pieces in like a jigsaw?
- Do you ever question yourself about why make the choices you do? For example, why did you put that colour there or that shape on top of that?
- Is there too much of one colour? Do you need some smaller contrasting shapes on top of a section?
- How could you extend your work for a better, different result?
Materials & Equipment
- Reference image of a cockatoo (a printout or photocopy that is ok to cut)
- Scissors
- Glue stick
- A4 Colour Paper
- Assorted / Scrap / Recycled Papers, such as:
Colour Paper
Patterned Paper
Handmade Paper
Hand-decorated Paper
Newspapers
Magazines
Old Maps/Melways
Inspiration
Related Artwork, Links & Sources
Share Your Outcomes!
How did you go!? We’d love you to share your artwork with us on Facebook or Instagram!
#zartart

